It goes without saying that the planning documents should be precise, clear and contain as much detail as possible. Out of all the architectural drafting, isometric architectural drawing is special because it manages to depict the 3D objects on a flat surface.
This specific blog post will discuss the explanation of isometric architectural drawings and how the basics of the drawing applies in the architectural industry, basics and tips that could aid in creating isometric architectural drawings.

What is Isometric Drawing?
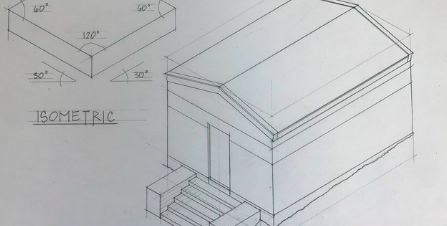
The technical drawing that attempts to represent a 3D object on a 2D media is called an isometric architectural drawing. In this type of drawing, the object is drawn as it looks if placed on the ground, its three important dimensions; width, height and depth are drawn inclined at an angle of 120 degree to each other. The reality that pervades this form of drawing makes it a favourable form of presentation among architects and designers as it is relatively easy to give dimensions and layout of structures without much distortion.
Why Use Isometric Design?
The following is a list of why isometric drawings are used: Isometric designs help in presenting large structures in a way that can quickly be understood. Here are some key benefits:
Clarity and Precision
Isometric drawings therefore portray very small aspects of views and they are very clear. This scaling type entails that measurements are proportionate and easily understandable concerning the overall dimensions and relations between elements in the design.
Versatility
Isometric drawings are very flexible and can be employed at any phase of the design to the building construction phase. It is most effective in displaying the organization of space and layouts of buildings.
Easy to Create and Understand
Compared to perspective drawings, the implementation of isometric architectural drawings is rather easier because of less calculations and art work needed. This makes them handy for practicing architects and designers as well as to the students in architectural design.
Components of Isometric Drawings
To create an effective isometric architectural drawing, it is important to understand its main components:To create an effective isometric architectural drawing, it is important to understand its main components:
Isometric Axes
Isometric axes are the three lines that show the height, width, and depth of the object that is to be drawn. These are usually drawn at 30 degrees with the horizontal to define the isometric grid on which the whole drawing is attempted.
Isometric Scale
In isometric drawing, each of the three axes has the same ratio and hence the scale is the same for all three axes. This is important if the measured items are to faithfully reflect the scale by which the drawing is made or if accuracy is to be maintained throughout the drawing.
Isometric Projections
The projection of the dimensions of the given object is done on the isometric grid. This means, converting the actual dimensions with the help of isometric scale into isometric dimensions. It brings near the real world representation of the object because it involves tracing an object on paper.
Steps to Create Isometric Architectural Drawings
To come up with an isometric architectural drawing, there are the following steps. Here’s a simple guide to help you get started:
Step 1: Prepare Your Tools
Drawing equipment will include a drawing board, T-square, set squares, and isometric paper or grid paper. Make sure that the tools you are using are of high quality to get a right measurement.
Step 2: Draw the Isometric Axes
Start by drawing the isometric axes. These are three lines that intersect at a single point and are inclined at 120-degree angles to each other. These lines represent the height, width, and depth of your object.
Step 3: Outline the Object
Using the isometric axes as a guide, begin outlining the basic shape of the object. Draw lines parallel to the axes to define the edges of the object. Ensure that all lines are drawn at the correct isometric angles to maintain accuracy.
Step 4: Add Details
Once the basic shape is outlined, add details such as windows, doors, and other architectural elements. Use the isometric grid to ensure that all elements are proportionally accurate and correctly aligned.
Step 5: Finalize the Drawing
Review your drawing for accuracy and completeness. Make any necessary adjustments to ensure that all dimensions and details are correctly represented. Once satisfied, darken the final lines and erase any construction lines.
Tips for Effective Isometric Drawings
To create high-quality isometric architectural drawings, consider the following tips:
- Increased regularity with the isometric drawing technique will also gradually make you more accustomed to and precise with the techniques applied.
- There are many types of grid papers that are used in different kinds of drawings, and isometric grid paper is used for isometric drawings specifically. This has a printed grid line on it and this would assist in terms of maintaining the degree of precision of the drawings.
- In isometric drawings, a particular concern must be paid to the scale since different phases should not be skewed or distorted in any way. Ensure you use the same scale while designing and take your time to double-check all measurements to make sure that all the elements are accurately proportioned.
Conclusion
Drawing in isometrics is also useful to the architects and designers and it is a method of graphing up three dimensional objects on a two dimensional plane. Thus, it is possible to create more precise and fine drawings connected with various architectural designs using the principles and techniques of isometric drawing.
That is why learning isometric architectural drawings is beneficial for everyone, starting from professionals to students, because it helps to represent architectural creations in the most effective way.
Use Our Architectural & Structural Drafting Services


